
View Basket0 item(s) in the basket.
With the “modest” light output of vintage and classic car headlights careful aim and focus is essential to optimise the available light on the road. INCORRECTLY focused or aligned headlamps can be a major source of annoyance and danger to oneself and other road users during darkness. Headlamps which appear to be correctly aligned upon a cursory examination may not, in fact, be so, and may dazzle other drivers without the owner being aware of it.
With exemption from MOT tests for classic vehicles it is especially important that owners check their lights for dazzle and aim regularly, and after any maintenance work that may have altered settings or the car's stance.
This is the first in a series of articles on maintaining and improving the lights on your vintage or classic car.
The best way to check and adjust the aim of dual filament lamps is as follows.
First, check the lamps are clean and condensation free. Working in the dark choose a suitable wall, garage door or fence and position the car 2 or 3ft from the wall with the low beams switched on. After measuring the height of the car's lamps from the ground, make a horizontal mark with chalk or tape on the wall to correspond with the centres of the beams. The width between the two lamp centres is next taken and intersections are marked on the horizontal line where indicated (Fig. 1). The centres of brightness is what we are marking on the wall.
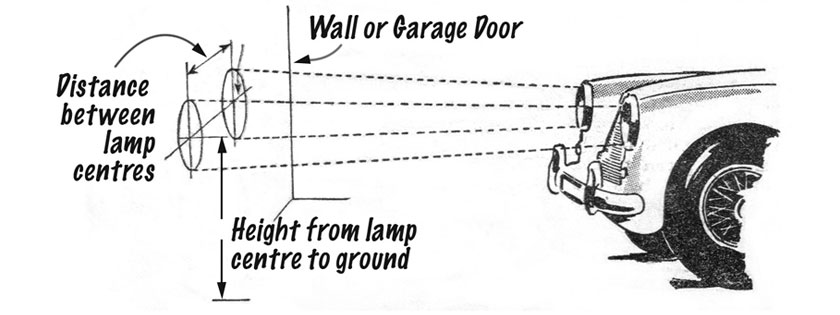
Fig. 1 Marking the wall with reference lines
The car is then positioned about 25 to 30ft. (8 – 9m) distance from the wall and the dipped headlamps are switched back on. It is manoeuvred so that the light thrown from the lamps corresponds as closely as possible with the markings made on the wall. The car must be positioned absolutely parallel to the wall and the ground surface must be perfectly level, otherwise, an incorrect indication will be given.
You may want to leave the engine running during adjustment if the battery is too weak to keep the lights at full strength. It is easier to work on one lamp at a time, covering the other with a towel or cardboard.
The ideal setting for performance and to obviate much dazzle to oncoming traffic is for each beam’s disc of light to be centred on its vertical line, with the height of the intense area of light just below the horizontal centre line marked on the wall (Fig. 1). The settings should be made with the car normally loaded – half a tank of fuel, driver and correct tyre pressure, otherwise the lamps will assume a slightly upwards angle when under load and cause a deflection of the beam. If it is inconvenient to load the car, due allowances must be made by aligning the headlamps so that the disc of light is so positioned that its centre is slightly further below the intersection mark.
If correction is necessary, it is not too difficult.
On more recent post-war cars, where the headlamps are set flush in the front wings, the alignment is usually affected by a vertical and lateral movement of the reflector. There are several methods of obtaining this adjustment, but perhaps the most popular is by two or three spring-loaded screws which are located behind the lamp rim. To gain access to the screws, the rim is removed by unscrewing the clamp screw at the bottom (some rims are split for easy removal), and then the rubber sealing ring beneath is removed which will expose the three adjusting screws. The upper screw trims or adjusts the beam vertically, while the lower ones adjust. the. horizontal position (Fig. 2). Thus any desired alignment may be made by means of these adjusting screws. Note, you will find adjustment of one screw tends to affect the others. When replacing the rim, do not forget to re-install the rubber seal ring and if it shows signs of deterioration, a replacement should be obtained.
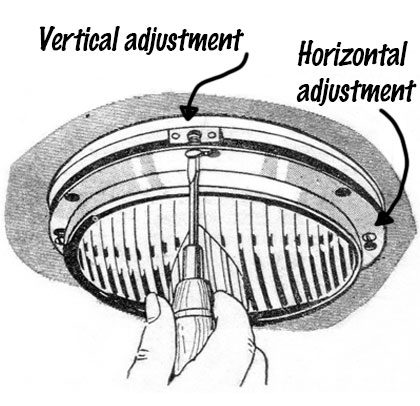
Fig. 2 Adjusting a flush-fitting headlamp such as the typical Lucas sealed beam
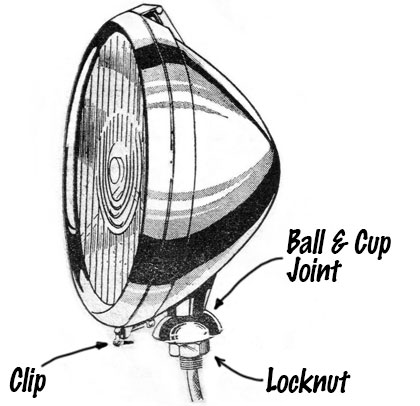
Fig. 3 Adjusting a vintage freestanding headlamp
Most pre-war and some post-war cars have freestanding headlamps supported on a ball and cup type joint, and it only requires the locking nut to be loosened to enable the lamp to be moved in any desired direction (Fig. 3).
Do not over slacken the nut otherwise, the lamp will be too loose for an accurate adjustment to be made. When the lamps have been correctly aligned, re-tighten the locking nuts while supporting the lamp with the hand to prevent any movement from occurring. A re-check should then be made to ensure that the alignment has not altered.
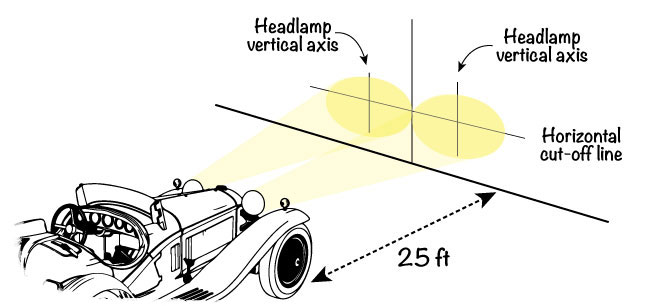
Fig. 4 Main Beam adjustment - centres of beams just below cross marks
Fig. 5 Dipped Beam adjustment - flat tops of light 2 inches below the horizontal lamp centre line, and aiming slightly to the nearside
Although classic vehicles over 40 years old are exempt from MOT tests in the UK, and vintage lamps will not have such defined beams, it is worth bearing these standards in mind when adjusting your vehicle's headlamps. Lenses with a block pattern on the glass will usually feature a "kick-up" to the near-side to illuminate road signs. If present, the image break-point must start at least 2% away from the centre line. This 2% figure is for the MOT testing machines, no measurement for our wall is available, so it is down to common-sense and guesswork! Any white light falling on the "dazzle zone" would fail the test.
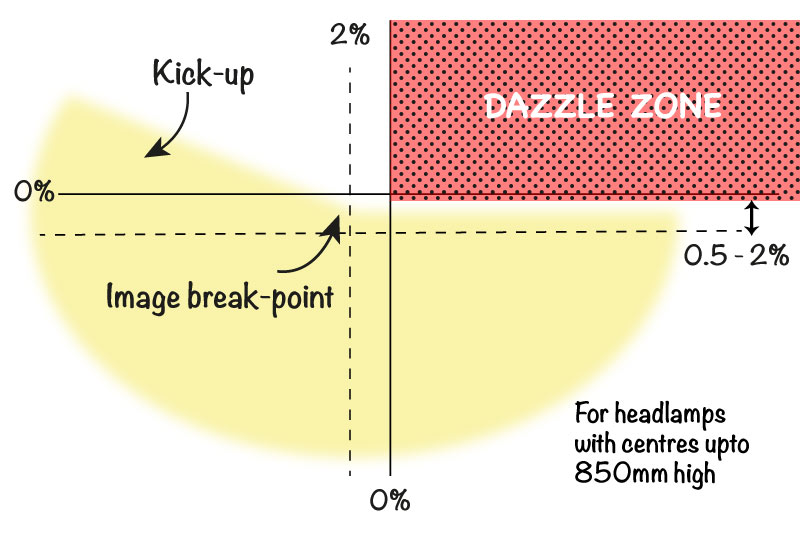
Fig. 6 Dipped Beam adjustment for an individual beam. No light should be in the "Dazzle Zone"
Please note the diagram is for the UK (RHD vehicles)
Please note FOCUS is distinct from alignment, and is something most modern motorists will not have experienced. With most modern lamps it is not possible to alter the focus as they are fitted with pre focus bulbs. With pre-war types, however, it is possible to adjust the position of the bulb in relation to the reflector to obtain a correct focus. This adjustment was made by the bulb holder being provided with several alternative positions, or by a sliding lamp-holder clamped into the desired position behind the reflector. In these types, a cork sealing ring is used to prevent the ingress of moisture and dust upon the delicate reflector surfaces; more recent models have a rubber sealing ring for the same purpose. Differing tolerances of the filament position within the bulb between manufacturers made this focus feature very important.
Access to the reflector is obtained by releasing the clamp screw at the bottom of the rim and then removing it together with the glass front. The cork or rubber sealing ring beneath the rim is then removed, underneath which in some older type lamps is a small countersunk screw which locates the reflector into position. After removing the screw, the reflector is given a slight twist to disengage and then is lifted away from the lamp body. On later models, the reflector is retained by a moulded rubber ring and can be withdrawn when the ring is removed.
Take great care not to touch the surface of the reflector, and if cleaning is required use only a very soft cloth, as used to clean glasses or camera lenses. Any polishing agent should most definitely not be used as it will remove the protective coating and rapid oxidisation of the silvered surfaces will occur. If the reflector is in a bad condition, it can be re-silverplated and will result in a vastly improved driving light, but the process is very expensive now (in the region of £100 per headlight).
When re-focusing the lamps it will be very helpful to cover one while checking the other. A bulb that is in correct focus will throw a clearly defined and evenly illuminated disc of light, and the necessary adjustments should be made until this is obtained. Generally, it is a good idea to have a slightly wider beam on the nearside for lighting the immediate area in front of the car. A long, comparatively narrow beam is obtained by moving the position of the bulb forward in the reflector and moving the bulb backwards creates a wider and less penetrating beam. When replacing the reflector assemblies take great care not to damage the sealing rings, especially those that are cork.
Please note
All articles and guides are provided only for the interest of classic and vintage car owners. Much of the information presented will be old and it may be that since the period source material was created, better solutions have been found. A certain level of mechanical and electrical knowledge will be required in undertaking work as described in these articles, and anyone unsure of their abilities is advised to seek professional assistance.
Vintage Supplies Ltd cannot be held responsible for any breakages and injuries that may occur, while working on a vehicle following any guides provided. With older vehicles being exempt from MOT checks, responsibility for vehicle safety and legality rests entirely with the owner.

